Microengineering Labs Serial Programmer
Our programmers may be used for in-circuit serial programming of
serial programmable PIC MCUs through the 10-pin expansion header J3. The
U2 programming header is detailed below. Our other programmers use the
same header pin-out.
If you re designing a PCB or circuit for ICSP, read the considerations
below. At the bottom of this page, you ll find a
guide for connecting a board that is already equipped with a 10-pin header that
matches our programmers. A LAB-X Experimenter Board, for example.
PIN
SIGNAL
1
5V always on It is not recommended that you use
this supply to power your target board. Current capability is
limited.
2
Programming Voltage Vpp - Connect to MCLR/Vpp pin
on target device.
3
Reserved - do not connect
4
Switched Vdd This pin should not be used to power
your target board. It is intended to power a target PICmicro
only when one of our programming adapters is used.
5
6
Programming Data - Connect to PGD or ICSPDAT on the
target PICmicro
7
8
Programming Clock - Connect to PGC or ICSPCLK on
the target PIC MCU.
9, 10
Ground - A ground connection to your target board
is required.
Design considerations for ICSP-capable circuits Refer to schematic
diagram below.
1. If possible, dedicate the Programming Clock and Data pins to ICSP.
If you must also use these pins for other purposes on your board, some thought
should be given to the type of hardware that is connected. The best case
is to use the programming pins for normally-open, pushbutton inputs. As
long as you don t push the buttons while programming, the switches won t affect
things at all.
If loads are connected to the clock and data lines, they must not interact with
the clock and data signals. Capacitive loads will cause
problems. High-impedance loads are usually ok. LEDs with
current-limiting resistors are less desirable, but usually don t cause problems.
You should always prototype and test the ICSP connections before sending your
PCB design out for fabrication.
2. The MCLR pin on the PIC will be driven to approximately 13V during
programming. This raises two concerns. The first is that your
circuit must allow 13V on the pin. Don t connect the pin directly to the
Vdd rail. The second concern is that the rest of your circuit may need to
be protected from this voltage. If 13V on the MCLR pin might put at risk
other components on your board, use a diode in series with the RESET pullup to
keep the 13V off of the Vdd line.
3. Configure MCLR as a RESET pin if possible. The
programmer will attempt to reset the target device at the beginning of the
programming process. If the MCLR pin is configured as an input, the
programmer may have problems putting the chip into program-mode. This is
especially problematic if the target has been previously programmed and is using
the programming clock or data lines as outputs.
In some situations, there just aren t enough pins to allow the use of a
RESET. Your project will require that MCLR be used as an input. This
is common on small, 8-pin PIC MCUs. In these cases, it helps to
set the clock and data pins to inputs and place a delay at the beginning of your
code. This will allow you to cycle power to the part and start the
programming process while the pause is executing.
In a PICBASIC PRO program intended for the PIC12F675, you might start with:
TRISIO FF set all pins to inputs
PAUSE 1000 wait a second
This can make reprogramming much easier to accomplish when the programmer has
no means to reset the target device.
4. Make sure the low-voltage programming
pin is pulled to ground. Low-voltage programming is not used by melabs programmers and should always be
disabled in the configuration settings. Even so, the low-voltage
programming pin labeled PGM or LVP should be pulled to ground when
programming. If it is left floating or in a high condition, it may
interfere with the programming process. We use a 100K resistor to pull the
pin low when designing a board for ICSP. For most 16F series parts, RB3
doubles as the PGM pin. On 18F series, it is usually RB5 that needs to be
low. Notable exceptions are the 16F62x and 16F64x family, which need RB4
to be pulled low.
5. Always connect every available power pin to the appropriate power or
ground source. Many PIC devices have multiple pins that are labeled Vdd,
Vss, AVdd, and AVss. If even one of these pins is left unconnected, it may
result in programming errors. This applies to analog supply pins even if
you don t plan to use the analog functions.
6. Use bypass capacitors between Vdd and Vss. This is good
practice in any case, but it s especially important for ICSP. A single capacitor
of 0.1uF is the minimum recommended, but more is the norm.
7. Connect a 5V supply to the Vdd pins on the PIC. You can
do this with the normal power supply on your board or with an external
supply. The ICSP header on the programmer has a 5V pin pin-1 that can be
used, but only if your board doesn t consume too much power. The Vdd pin
pin-4 on the header shouldn t be used. Such use will probably cause
errors during programming, and it s possible that it will damage the programmer
hardware.
If your board is designed to run at a lower supply voltage like 3.3V and you
can t safely connect 5V to the PIC, you may have issues when erasing a flash
PIC. For some devices, a low-voltage erase option is available Options
More Options in the meProg software. Do not enable low-voltage
programming in the configuration settings. This setting has nothing to do with the
supply voltage for the PIC.
Some of the new PIC microcontrollers cannot by powered at 5V. These
parts usually require additional circuitry for in-circuit programming. See
the following link for details: PIC18FxxJ,
PIC18FxxK, PIC24xJ, and dsPIC33FJ 3.3 Volt Programming Information
Note for PIC17C7xx: These
practically obsolete devices may
also be programmed in-circuit. However, different pins are required than are
detailed here.
See the Microchip programming spec on these devices for more information.
The following schematic shows a typical ICSP connection for the
PIC16F876A
Connecting a programmer to a LAB-X board for
in-circuit serial programming
Install the programming software according to the instructions included with your
programmer.
Connect your programmer to the LAB-X board using a 10-pin ribbon cable
part 10CAB. Do not twist or fold the cable to make the connection. The
connectors on the programmer and LAB-X boards should line up to allow a straight
connection.
If your LAB-X board has a ZIF socket, raise the lever. Insert the
microcontroller into the socket on the LAB-X board and lower the lever to lock
it into place. Make sure that the notch on the end of the microcontroller is
aligned with the lever end of the socket.
If your LAB-X board does not have a ZIF socket, carefully line up the
PICmicro microcontroller s pins with the holes in the socket and press it into
place. Make sure the notch on the end of the microcontroller is aligned with the
notch at the end of the socket.
Connect a 16VDC adapter part ACAD to the programmer s power jack not
required for USB/U2 Programmer. You may have
different adapters for the programmer and LAB-X board. Make sure you power the
programmer with the 16V adapter.
Connect a 12VDC adapter part ACADX to the LAB-X power jack. You must
connect power to the LAB-X board in order to program the microcontroller.
Run the programmer software on your computer and use the programming
procedure to program the part.
The LED indicator on the EPIC will
remain lit at half intensity when the EPIC is connected to the LAB-X board. The
indicator should light fully when a programming operation is in progress.
Products
Device Programmers
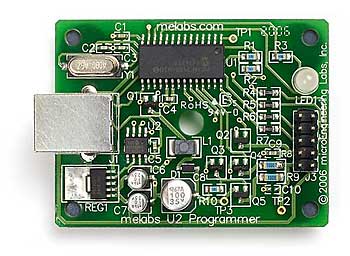
U2 Programmer USB
melabs U2 Programmer 4.50 programmer board only
melabs U2 Programmer 4.50 programmer board only
Quantity in Basket:
None
Code: U2
Price: 79.95
Volume Pricing:
Quantity
Price Each
2-4 75.15
5-9 71.95
10 67.96
Shipping Weight: 0.09 pounds
IN STOCK
RoHS Compliant: YES
Quantity:
The new and improved model of the popular melabs USB Programmer now
offers even more features than before.
More than 500 PIC microcontrollers are supported. Support for future
devices can be added via FLASH firmware updates.
Intelligent voltage regulation allows programming of the new,
low-voltage PIC MCUs as well as
standard five-volt devices.
The U2 is powered by the USB port. No additional external power adapter
is needed.
See Configuration Choices Here
Programming Adapters: We offer an extensive line of programming
adapters that allow you to program devices in DIP, Surface Mount, and PLCC
packages. To find an adapter to fit the part/package that you need to
program, see our Programming Adapters section.
In-Circuit Serial Programming: The U2 Programmer is capable of
programming PIC MCUs in-circuit. This allows you to solder the chip to
your board before you program it, making both development and production more
convenient. To use this feature, your target board must have some means of
connecting to the 10-pin header on the programmer. The required
connections are detailed in our support section.
Automated Programming: The melabs Programmer Software can be
controlled with command-line switches. This allows you to automate repetitive
programming processes for production or development. You can even disable
the graphic user interface GUI so that options and settings can t be changed
accidentally. This also makes it possible to perform multiple programming
tasks from a batch file or custom application.
Software: The programmer includes software for Windows
98/Me/NT/2000/XP/Vista/7. This
software allows you to control the programmer and set the configuration bits on
the PIC. The software may be run as a standalone application or launched
from most program editor/IDE packages like MicroCode
Studio.
The melabs programmer software is compatible with the standard Microchip HEX
format files. Any assembler or compiler for PICmicros can be used to
create the program, including MPASM, C, or PICBASIC PRO.
The same software that controls the U2 Programmer can be used with all models
of our programmers, including EPIC parallel port programmers and melabs Serial
Programmer. The software can even control multiple programmers on one
computer.
The software allows you to set configuration bits on the PIC with an
easy-to-use list of options. Each configuration option is selectable in a
drop-down list. Configuration data may be read from a hex file or from a
PIC.
The consolidated view-memory window lets you view each section of memory in
the PIC with a click.
A formidable list of
options allow you to customize the way you
interact with the software. You control what areas of the device are
erased, programmed, and verified. Save mouse clicks with options like
Disable completion messages and Erase before
programming.
The programmer s firmware can be upgraded electronically with the click of
the mouse. You don t have to worry about whether your hardware is
compatible when purchasing a software upgrade. Any required firmware changes will be
included in the purchased upgrade.
Configuration Window
Memory Window
Options Menu
melabs USB Programmer Features:
Powered from USB port
Fast FULL SPEED USB data transfer
HID interface
Standard USB cable Type-A male to Type-B male
Full featured, command-line operation
Automatic Vdd and Vpp adjustment for different PIC MCUs
Dual-color indicator shows ready/busy states
In-Circuit Serial Programming ICSP connector for interface to project board
Full featured software included with support for ICSP-capable PIC
MCUs
Flash firmware easily upgradeable to add support for future devices
Compatible with Microchip HEX format files
Compatible with all Programming Adapters
Current device support, melabs USB Programmer for Windows
98/Me/NT/2000/XP:
Scroll in the frame below to see the complete list. If your browser doesn t support inline frames,
click here for a new window.
nbsp.
Microengineering labs technical support forums If this is your first visit, be sure to check out the FAQ by clicking the link above.
MicroCode Studio is a powerful, visual Integrated Development Environment IDE with In Circuit Debugging ICD capability.
PonyProg Serial Device Programmer 0.44 MB PonyProg is a serial device programmer software with a user friendly GUI framework available for.
Click for larger image support links. The LAB-XUSB is a platform for experimenting with PIC R microcontroller MCU applications. It contains the circuitry required.
A HREF PICstart, MPLAB-ICD, Microchip PIC, PIC Programmer /A.

